

Customizing WebCenter Content Server: Part 3 – Templates
By: Dwayne Parkinson - Solution Architect
8 min read
By: Dwayne Parkinson - Solution Architect
For those of you coming from the land of 10g, you get to add yet another piece of information to the scrap heap that is “obsolete technical stuff I know.” Specifically, how to modify the menu structure in WebCenter Content has been changed in 11g. All of those NavBuilder tricks you know can rest in peace alongside your Perl and REXX programming skills. In this article I will cover how the new navigation model works in much more depth than is currently available in documentation or on the web.
In general, the way navigation works now is that you add a few files to a component which contain menu information then enable the component. The files make use of the new Data Include capabilities in 11g to append your menu entries to the default menu entries that are delivered with the system.
STEP 1: Add a Component
For this example we’ll add a new component, but if you already have a custom component that is used in your business, you can certainly skip this step and just add the menu resources to your existing component.
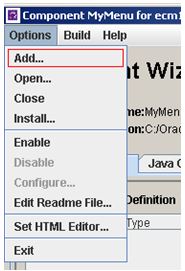
From the Component Wizard select Options and then Add
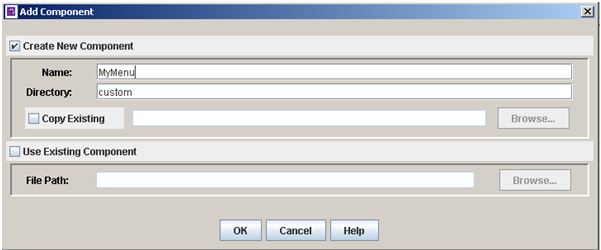
On the next screen we will fill in the name of the new component, leave the other fields at the default and then click OK.
(For more info on how to access and use the Component Wizard see http://docs.oracle.com/cd/E23943_01/doc.1111/e10807/c09_components.htm#BEIBBGCJ)
Once the component is created, we can begin adding the menu resources. The first resource we’ll add is CoreMenuItems. We will choose an HTML include/String resource as the type of resource definition.
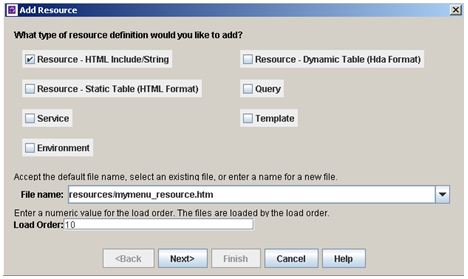
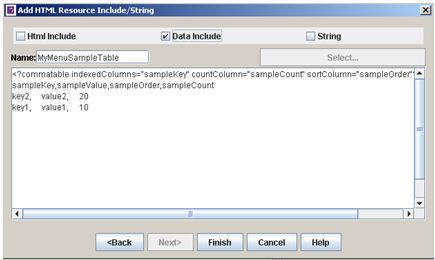
On the next screen check the Data Include box. This will change to the Data Include screen, which should look something like the one shown below. If the default text doesn’t appear, don’t worry. We have to replace it all anyway.
STEP 2: Create CoreMenuItems
CoreMenuItems is one of two resources you will most likely use to modify navigation. It contains a list of menu items. These are merely definitions of a menu item and aren’t meant to show where in the menu structure a menu item may exist. If you are only rearranging the existing menu structure you won’t need this file, but assuming you want to add a menu item this file is necessary.
When creating these files keep in mind that the values in your file will load last and if you have the same name as one of the system values, your menu item will override the system value (discussed shortly). For now, let’s create a few menu items so we can show some of the flexibility of this new navigation model. Below is a screen shot of a sample menu item resource. Let’s look at it in close detail.
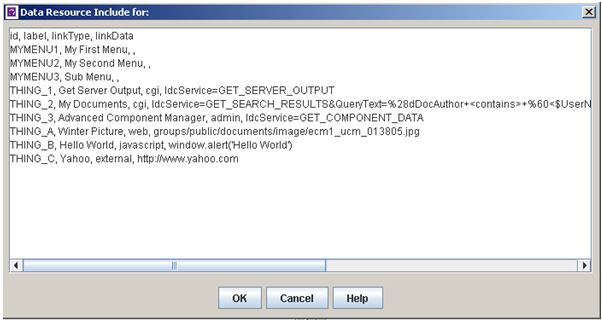
Name: this must be CoreMenuItems and the case must match exactly. Remember you’re appending to a resource that’s already out there.
In the editor, the first line identifies the column headings in the CoreMenuItems and it must be there. Specifically the columns are:
The next three lines (MYMENU_1, MYMENU_2, MYMENU_3) define menu heading items that have no actions. These will simply be menu headings that are used to display a sub-menu. Notice that there’s no LinkType or LinkData.
Finally the last six lines are menu action items that will perform various tasks. There are examples of each type of link except Enterprise. Notice also that THING_2 is a search and we include an Idoc Script reference to <$UserName$>. Idoc Script can be used throughout the menus.
STEP 3: Define CoreMenuItemRelationships
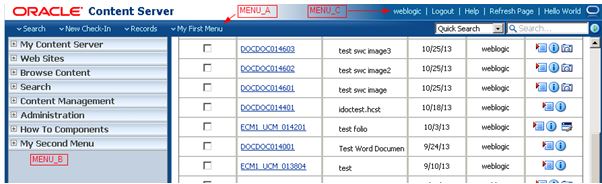
CoreMenuItemRelations is used to define where within the menu structure a specific menu item exists. As with CoreMenuItems, we will be extending and potentially overriding the values that come with the system. However, the very first thing we must know is that there are three default menus that ship with content server. They are not so cleverly named, MENU_A, MENU_B and MENU_C and located as shown below
Top
Menus
![]()
Trays
The CoreMenuItemRelationships describes the relationship of menu items within the content server. The sample below shows how the menus above were created. Let’s take a closer look at this information.
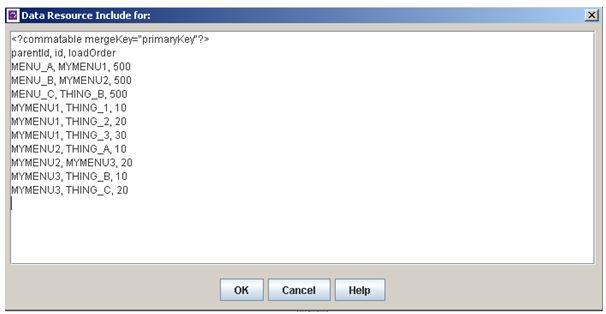
The <?commatable mergeKey=”primaryKey”?> line is very important and required to make the information merge correctly to the system default menu information.
The parentid, id and loadOrder specify the ID of the parent menu item and the child menu item as they are defined in the CoreMenuItems. The load order determines the location on the menu.
As you can see, we add MYMENU1 to MENU_A which results in the My First Menu being added to the MENU_A navigation bar. A load order of 500 is used to ensure that the entry shows up at the end. Shown farther down you can see that the same menu item can be used on multiple menus. The final menus look like this.

It’s important to know that MENU_C is different than the other two menus in that it will only display a single item. It is intended for invoking action on the content server, rather than displaying a menu. If a menu item with no LinkType and LinkData (like MYMENU1) is attached to MENU_C, any corresponding menu items won’t be displayed.
STEP 4: Enable the Component
The final step is to enable the component and restart your content server. If your menus don’t work as expected or the content server fails to start, there is most likely a typo in one of the files.
Override Default Menus - The key to overriding the default menus is to first find where they are. The menus are in the std_nav.idoc which is located in the ucmidcresourcescoreidoc folder within the WebCenter Content server instance. Searching for CoreMenuItems and CoreMenuItemRelationships within this file will provide information about how the menus are constructed.
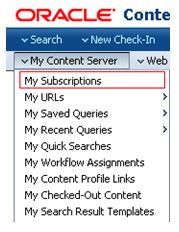
In our example we’re going to move My Subscriptions from the default location to the top of the My Content Server menu.
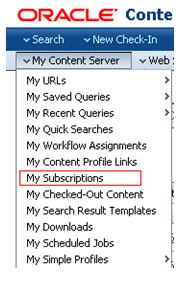
Searching the std_nav.idoc, we find the following line defines the MY_SUBSCRIPTTIONS menu item.
![]() And we further notice that the first entry in the MY_CONTENT menu has a load order of 10. To move MY_SUBSCRIPTIONS so it’s first in the menu we simply override the load order by adding the entry to our custom component as shown below.
And we further notice that the first entry in the MY_CONTENT menu has a load order of 10. To move MY_SUBSCRIPTIONS so it’s first in the menu we simply override the load order by adding the entry to our custom component as shown below.
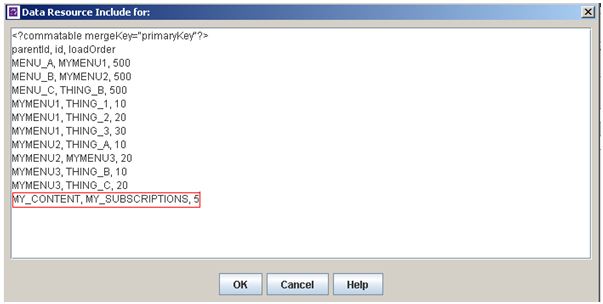
The result of adding that line is that the My Subscriptions item will be moved to the top of the menu.
Add Security & Other Flags via CoreMenuItemsFlags
In the new menu model, adding basic security and performing some systematic checks is fairly easy. In our example, we may want to have one of the menus with administrative options only show up for system administrators.
As we’ve done before, we return to our component and add another include. This time we add a CoreMenuItemsFlags include as shown below.
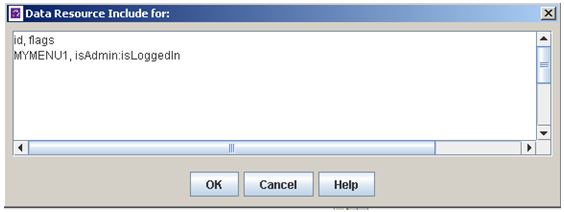
This is fairly straight forward. Supply a menu item ID and then assign some flags. The flags are separated by a colon. As shown above, MYMENU1 is disabled for everyone other than administrators and is not visible when not logged in.
If you’re like me this makes you ask two questions: where are the flags defined and what happens if I need to add security that isn’t provided by these flags?
The answer to the first question is that these flags are all defined in the std_nav.idoc document previously referenced but I’ve included them below for ease:
The second question is answered below.
Add Customized Security
The question often comes up of what to do about the menu items that aren’t covered by the default security flags above. For example, a very common request is to constrain a menu or option to only those folks who have a specific role. There are two ways to do this. The first is a bit of a hack, but I’m not too proud to tell you about it.
As you’ll recall, when we were creating menu items I mentioned that Idoc Script can be used throughout the menus, so a simple way to restrict menus or menu items to specific roles is to add Idoc Script right into the menu files like this:
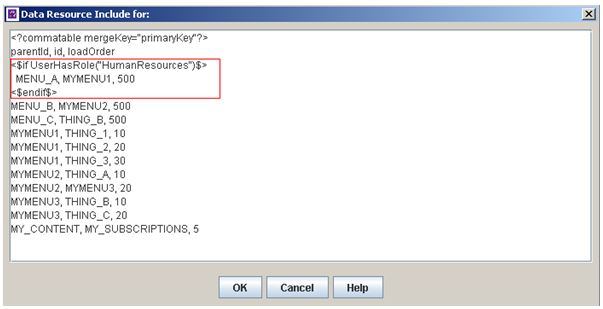
It’s not the “best” way to do the job but it will work in a pinch. For those who are seeking a more elegant solution, the best option is to add your own flags to the CoreMenuItemsFlags include.
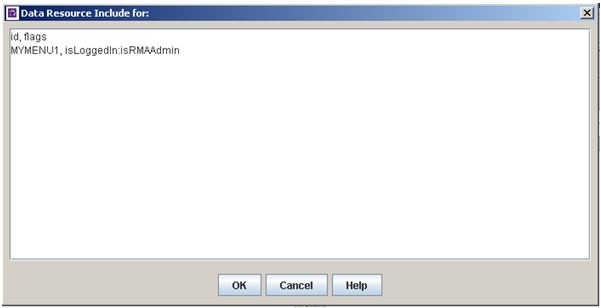
The first step to adding your own flag is to add an entry to the flags CoreMenuItemsFlags include and type in whatever you want for a flag name. For example if you are using records management you may want to make a flag called isRMAAdmin and use that to limit certain menu items to those folks who have rmaadmin roles. In our case we’re going to add the flag to MYMENU1 as shown below.
It’s worth noting that the colon serves as a logical AND, so as you add flags to your content server you are building flexibility into your menu items and may have several flags that are distinct to your implementation, for example:
MYMENU1, hasHumanResources: hasITAdmin:isContributor:isRMAAdmin
MYMENU2, hasITAdmin:isVP
In cases where you need to do a logical OR you will need to create a flag that performs the OR logic like Oracle did with isSubAdminOrSysManager.
As you’ve probably guessed, there aren’t magic elves that interpret your newly created flag and just make it work behind the scenes. You will have to extend the base functionality of the content server by extending the navigation_filter_rset_menu_item include as shown below. NOTE: this is the same resource that you can override to create custom link types, but we won’t go into that here.
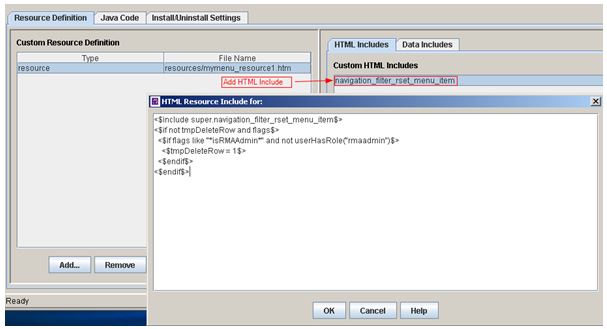
The first line of the code includes the existing version of the navigation_filter_rset_menu_item include. The next lines check to see if the flag matches isRMAAdmin and the user does NOT have a role of rmaadmin. If those conditions are met, the row is deleted from the menu. This effectively removes the menu. Obviously any Idoc Script can be used here to determine whether a menu row should be deleted, so you have tremendous flexibility.
We covered much of what the menu system has to offer, but there is more. Everything that has been covered above is included in the MyMenu sample component that is available with this blog. Perhaps the best additional resource for exploring the WebCenter menu system capabilities is through a sample component available from Oracle. The MenuExample.zip component is available for download here: http://www.oracle.com/technetwork/indexes/samplecode/webcenter-content-samples-1352729.html and it contains documentation and samples in addition to those we’ve provided. Between the sample component included with this blog and the Oracle example you should have much of what you need to make excellent use of the flexible new WebCenter navigation model.
For more customization help with your WebCenter implementation, contact us today!