

Customizing WebCenter Content: Part 4 - Query Resources
By: Dwayne Parkinson - Solution Architect
5 min read
By: Dwayne Parkinson - Solution Architect
As we conclude our Blog series on customizing WebCenter Content we are going to finally create a custom WebCenter Content service which will leverage the query and template we created in earlier Blog entries. Once we have a custom service created, it can be placed on WebCenter Content menus, called from applications, used in iDoc Script and other WebCenter Content services. While our service will perform relatively simple functions, you will see how the same steps can be used to build fairly elaborate customizations.
A Service is yet another type of resource that exists within a custom component, so the first step to creating a custom service is to create a custom component. We already have a custom component from our previous Blog entries, so using the Component Wizard we’ll open the example component we created in the previous Blog entries and put our service in that component.
To create a service you click the Add button in the Custom Resource Definition pane of the Component Wizard. On the next screen select the Service checkbox and accept the default names.
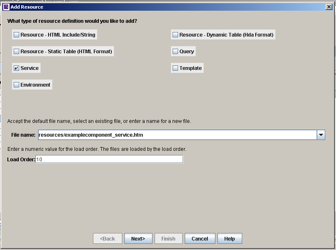
Make sure the service is in the “resources” folder and click on Next.
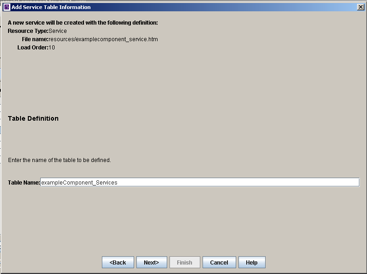
The next screen will ask for a Table Name which is used to store information about the custom service. Accept the default table name here as well.
Finally we get to the point where we can add our custom service and tie all of our work together. The top half of the screen defines our service while the bottom half tells what actions the service will perform.
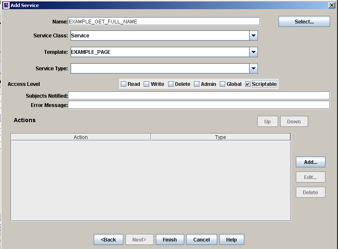
The Name field is the name of your service. The standard convention in WebCenter Content is for all service names to be in all upper case with words separated by an underscore. The service name will be what you see in the URL when the service is called. So in our case the portion of the URL with our service would look something like this: idcplg?IdcService=EXAMPLE_GET_FULL_NAME
The next field designates the class of service. The class of service is really referring to a Java class and it determines what actions can be performed by the service. For our example we’ll use the class of Service.
The Template field is used when there is a template to display results of the service. We are going to use our EXAMPLE_PAGE template resource that we created in a previous Blog entry. This template is a page that says “Hello World” with standard WebCenter Content page begin, end, etc.
The Service Type field we will leave blank. The type of Sub-Service is only used when you are creating a service that will only be called from another service. Our example service will be initiated directly from the URL so we will leave this blank.
The Access Level must have Scriptable checked for your service to execute.
The Subjects Notified is for defining which subsystems within WebCenter Content should be aware of this service. For our example (and in most cases) this will be blank.
Finally, the Error Message is a text field that defines the error message returned by the service unless one of the actions overrides it. For our purposes we will leave this blank and now we’re ready to start adding some actions to our service.
The action list defines which actions the service will perform and in what order. To add an action, click the Add button in the Action section.
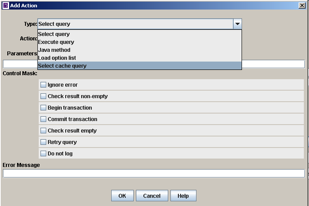
The Type of action indicates what type of resource we will be invoking from our service. The table below provides information on what each type of action does.
| Action Type | Description |
| Select Query | Executes a select query, but does not return the results. Instead, the query will return whether the execution succeeded or failed. |
| Execute Query | Executes data manipulation queries (insert, update, delete). The execution will not return any results, but will alter the database. |
| Java Method | Executes a Java method. The method can be contained in the Service or a handler. |
| Load Option List | Loads an option list into local data of the service. The option list is available to use in a template. |
| Select Cache Query | Executes a select query and puts the results into Content Server’s backend data. The output will be available as a ResultSet. |
Since we will be using the query resource we created in a previous Blog entry to return the full user name, we will use the Select Cache Query.
The next step in adding an action is to specify the name of the action.
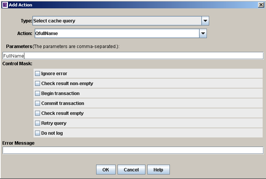
In our case the name of our query was QfullName so we will type that in to the action field. NOTE: There is a quirk in action field. When you tab out of the action field the first time it may default back to the first entry from the drop down list and you will need to retype your action name.
The Parameters section specifies the parameters for the action. Since we’re using a Select Cache Query, the parameter we specify will be used to store the results returned from our query. By entering FullName, the service will generate a result set with the name FullName. The result set will contain the results of our query.
The Control Mask is beyond the scope of this Blog, but documentation can be found here: http://docs.oracle.com/cd/E23943_01/doc.1111/e11011/c03_customizing_services.htm#CSSRG2048
The Error Message is the text that will be displayed if this action produces an error. We will leave it blank and allow system generated errors to be seen.
Now we can click on OK and complete the definition of our service.
To test our service we must first enable our custom component using the Component Wizard and then restart the content server so our component can be loaded. Once that’s complete, sign on and change the URL so it calls our EXAMPLE_GET_FULL_NAME service as shown below.
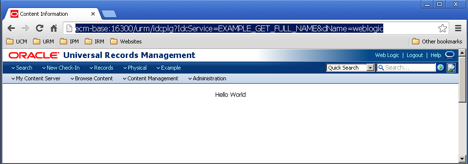
Notice that there’s a parameter of dName after our service. This parameter is required by the QfullName query we used so it must be supplied after the service call.
When we call the service you’ll notice that the EXAMPLE_PAGE template is displayed. This shows us that the template we hooked up to the service is working as expected since we’re seeing our “Hello World” message.
Of course we also want to know if our service actually returned the full name of the user by executing the QfullName query. To do that let’s execute our service again and append &IsSoap=1 to the end of the URL as shown below.
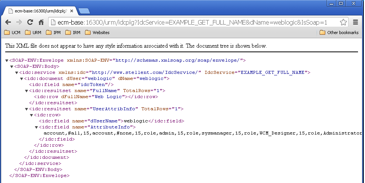
When using the IsSoap parameter, the results are redirected from our EXAMPLE_PAGE template to a SOAP envelope which is nothing more than an XML file. As you can see, the result set of FullName contains a row that says the full name for user weblogic is Web Logic. (Remember, we specified FullName as the parameter on our Select Cache Query and that’s how the result set gets its name)
We would be remiss if we left our discussion of custom components, services and templates without actually displaying the results of our query on our template. While it’s beyond the scope of this Blog to dive deeply into the iDoc scripting language, thankfully we only need a few lines of iDoc Script. Within the Component Wizard, highlight the template resource and select our EXAMPLE_PAGE template. Now we can click on the Launch Editor button in the lower right corner of the screen and add the highlighted lines of iDoc Script to our template.
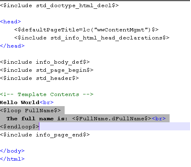
Once those three lines are added, the server must be restarted and then we can execute the service again. With our template changes in place, the service will show the following screen.
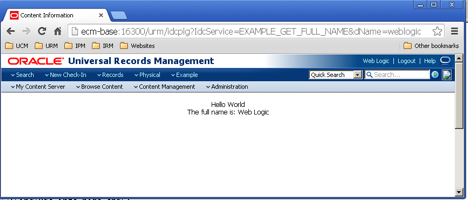
We have covered a lot of ground to merely show Hello World and the full name of a user, but the principles we’ve demonstrated are incredibly powerful. As you can see, WebCenter Content is not just a piece of software; it’s a framework that can be extended for developing truly custom solutions to meet the unique needs of your organization.
For more information about the possibilities of extending WebCenter Content to meet the requirements for your next project or to request customized training for your development team please contact TEAM Informatics and ask about our extensive WebCenter Content customization capabilities.